

Not every refrigerator ice maker has a round test button.
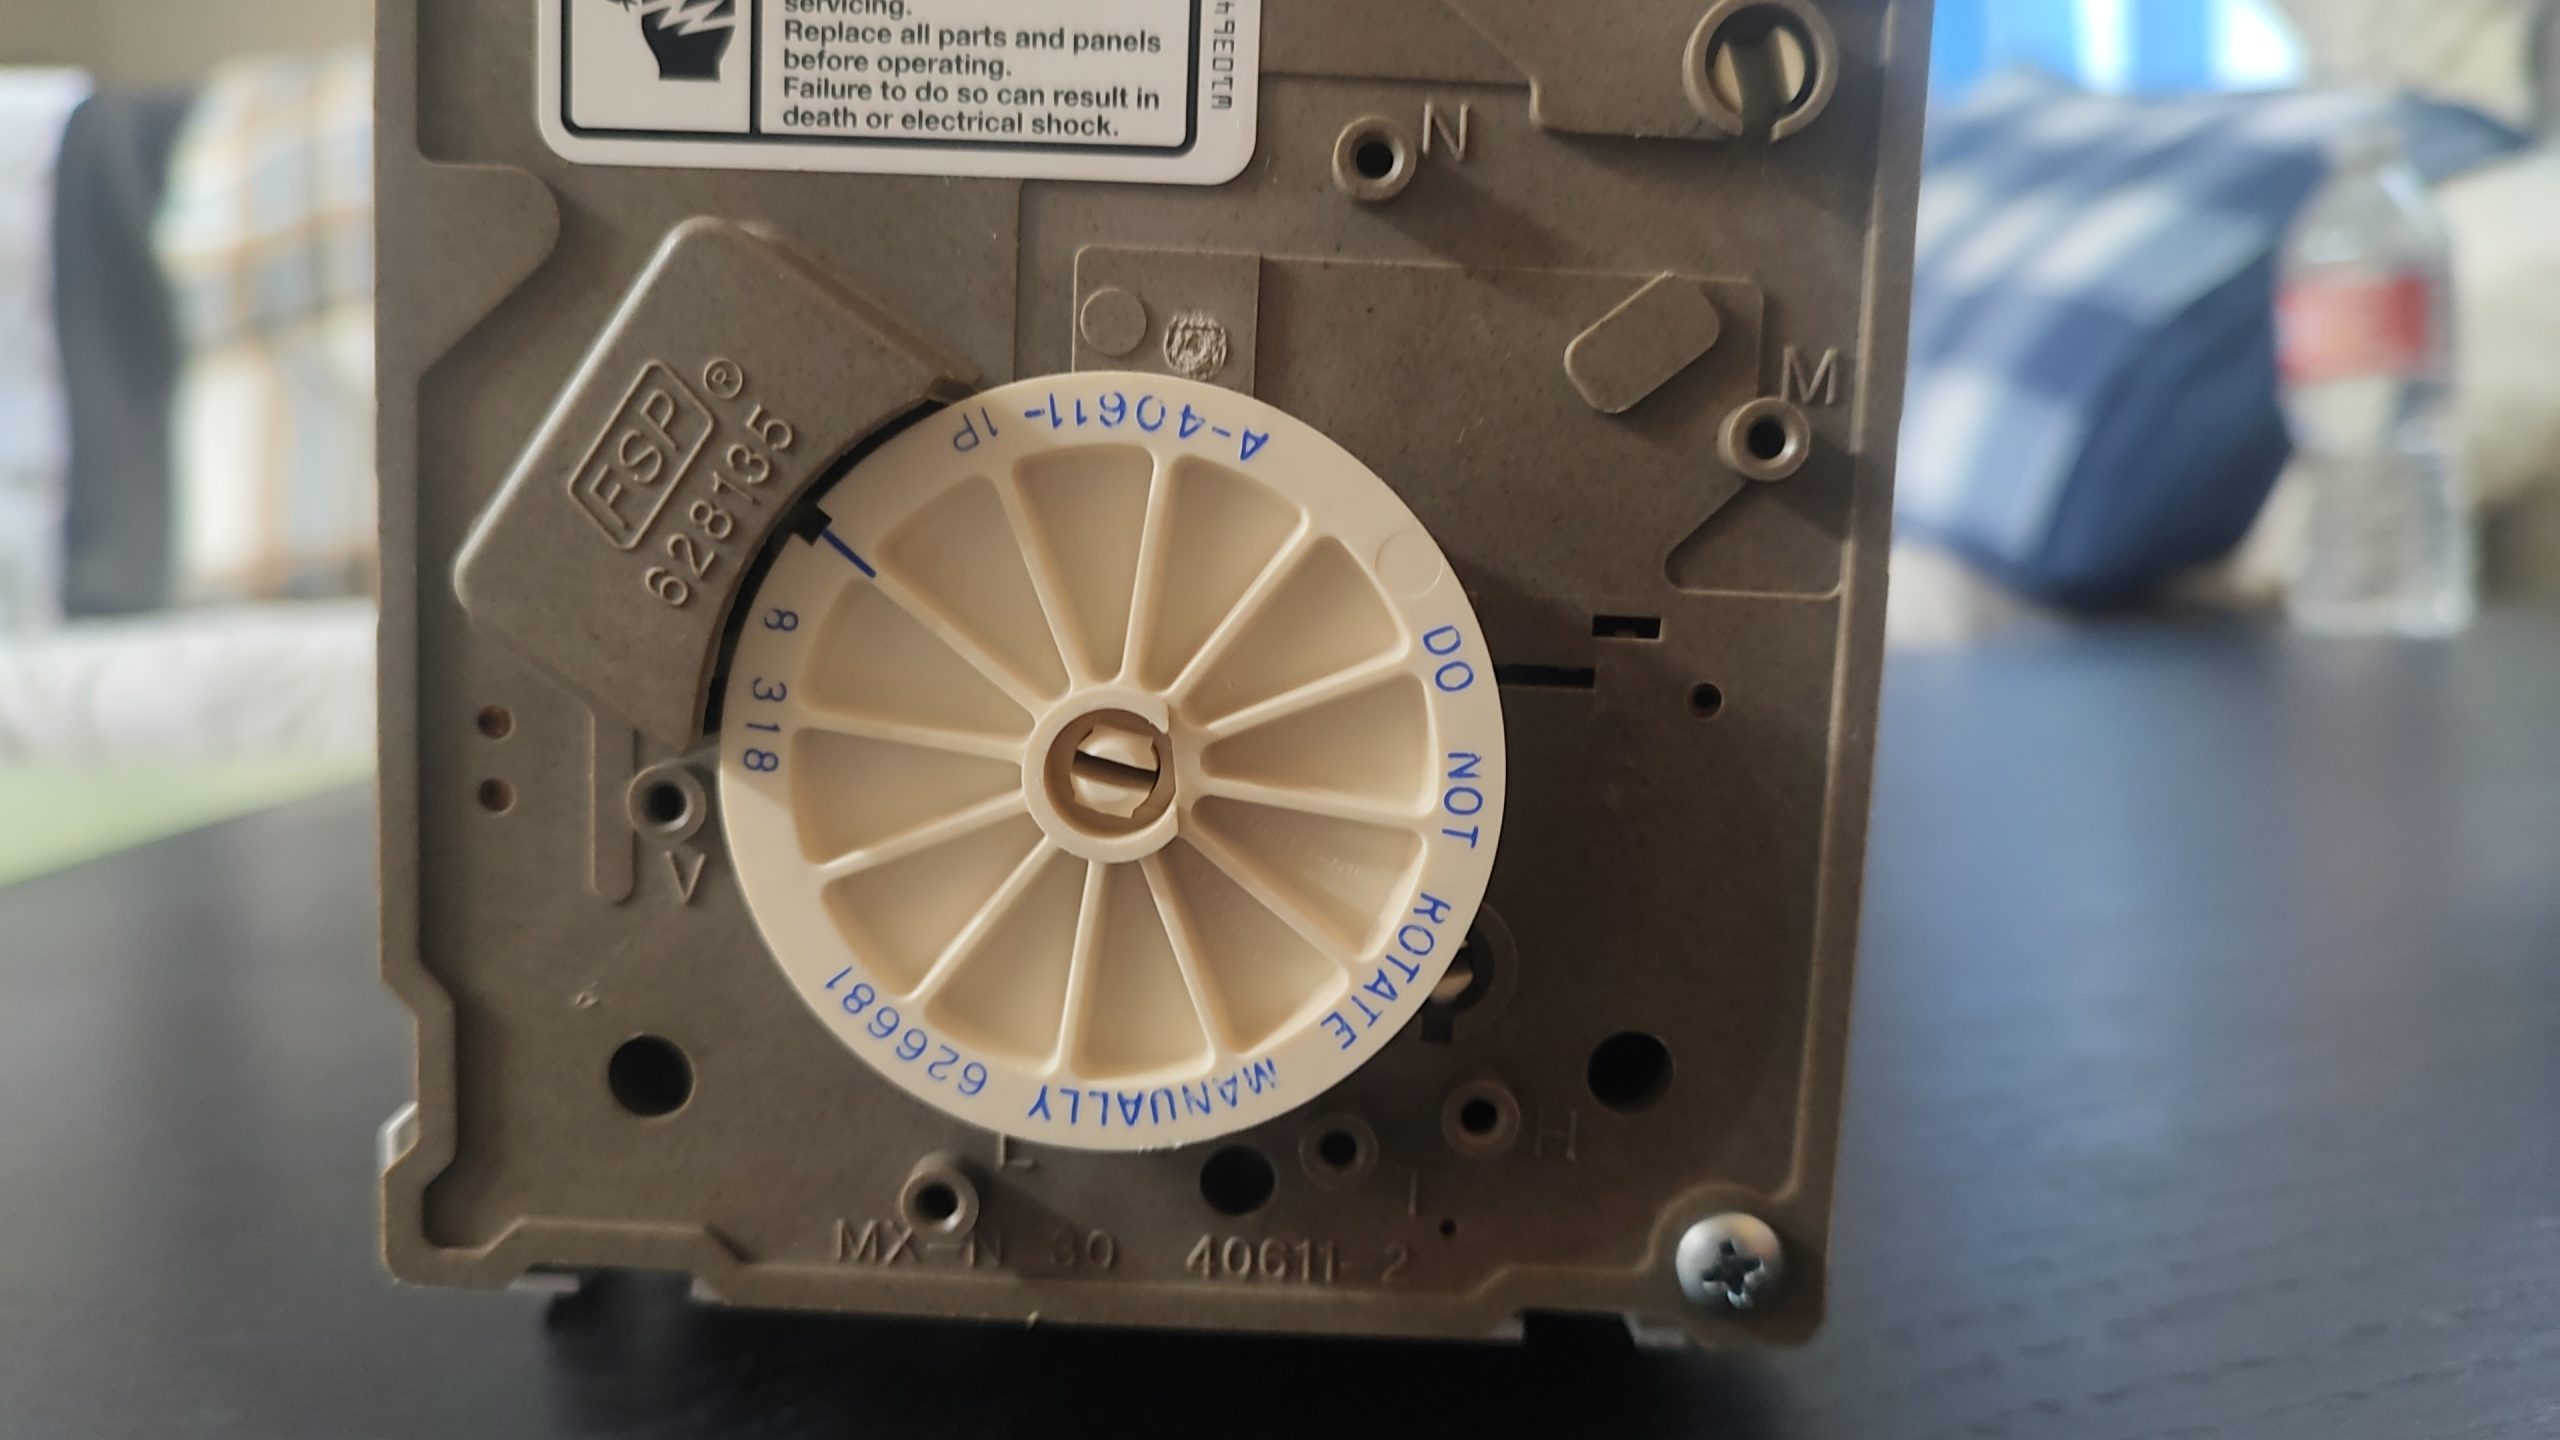
Many older self-contained 120V ice makers use a mechanical control module instead. Behind the front drive cover, the module has small service terminals marked L, N, V, T, and H.
Those terminals allow a technician to check the harvest cycle without waiting for the ice maker to decide on its own that the water has frozen.
This article applies to that specific type of 120V ice maker. It does not apply to low-voltage ice makers, door-mounted ice makers, separate ice rooms, optical “laser” systems, or modern electronic modules with a dedicated test button.
For the full diagnosis sequence—temperature, power, water supply, control-board involvement, and deciding whether the assembly needs replacement—read Ice Maker Not Making Ice? Diagnose Before Replacing.
First: Do Not Turn the Drive Wheel by Hand
The large plastic wheel behind the front cover is part of the mechanical drive module.
It may look like you can rotate it with a screwdriver and force the ice maker through a cycle. Do not do that.
The module itself is marked “DO NOT ROTATE MANUALLY” for a reason. Turning the wheel by hand can damage the internal gears, switches, or timing mechanism. It can also leave the ice maker in the wrong position and make the diagnosis more confusing.
This Is a Technician Test, Not a DIY Repair Step
This test involves live 120V power.
A technician needs to identify the correct terminals, confirm incoming voltage, use a properly insulated jumper, and know exactly when to remove it. Putting a jumper into the wrong terminals can damage the module, create a short, or expose you to electrical shock.
I do not recommend doing this yourself.
The purpose of this article is to explain what the test proves and why a technician may use it before recommending replacement of the complete ice maker assembly.
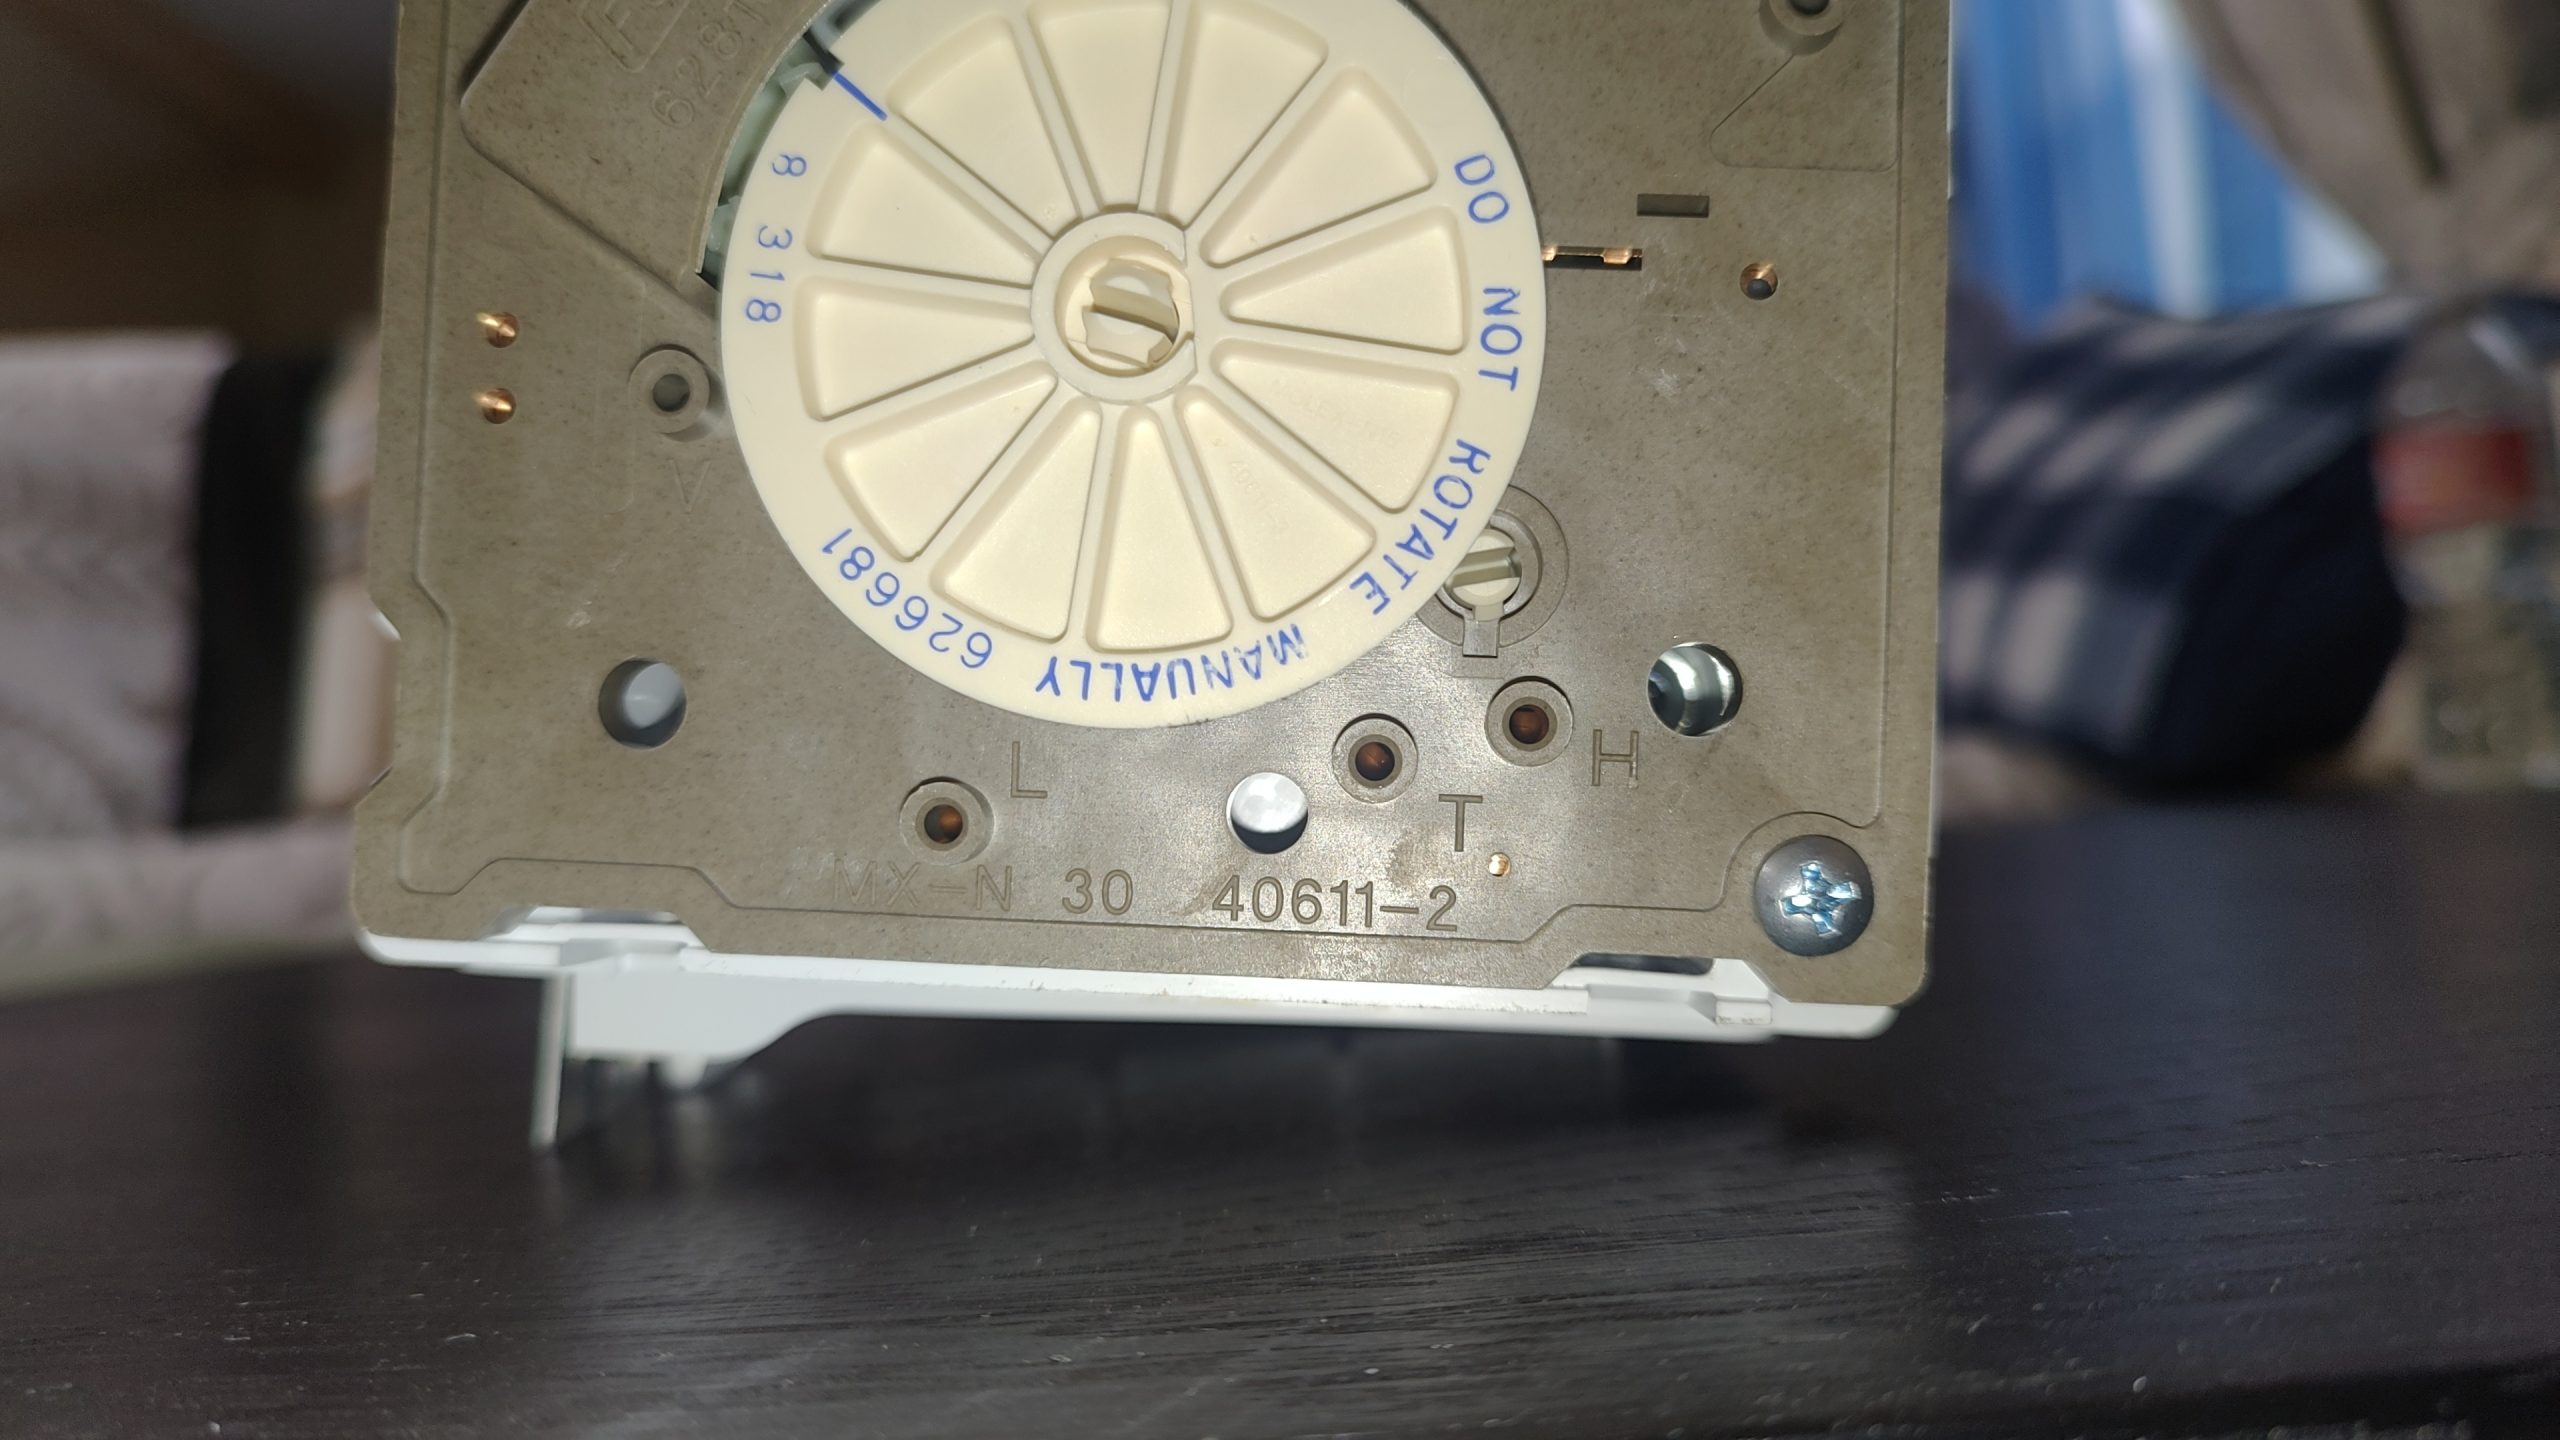
Service Terminals: L, N, T, H, and V
On classic self-contained 120V ice makers, this lettering is essentially standard:
- L — incoming line power
- N — neutral
- T — internal thermostat circuit
- H — harvest-heater test terminal
- V — water-valve circuit
In my experience, these letters are used consistently on this style of mechanical ice maker. The terminal markings must still be clearly visible on the actual module before any testing is done. Do not guess based on a similar-looking ice maker found online.
First Check: Is 120V Reaching the Ice Maker?
Before forcing a harvest cycle, a technician confirms that the ice maker is receiving normal power.
This is checked with an ordinary multimeter between L and N on the ice maker module. Under normal conditions, the reading should be about 120V AC.
Some refrigerators route ice maker power through the door switch. With the door open, there may be no voltage at L and N even though the ice maker and its power circuit are fine.
During testing, the door switch must be held in the closed-door position to simulate a closed refrigerator door.
If the door switch is already held closed and there is still no 120V between L and N, the problem is not inside the ice maker itself. The fault is somewhere in the refrigerator’s wiring, connector, door switch, or power circuit. At that point, the diagnosis moves beyond the ice maker itself and into the refrigerator circuit. Refrigerator repair service covers that broader diagnostic path.
How the T-H Harvest Test Works
Before starting the harvest test, a technician confirms three basic things:
- The freezer is cold enough for normal ice production.
- The ice maker is installed, connected, and in its normal home position.
- Proper 120V power is present between L and N.
Once power has been confirmed, the technician briefly connects T and H with a properly insulated test jumper.
That temporarily bypasses the internal thermostat and forces the ice maker to begin a harvest cycle.
The jumper is removed as soon as the motor begins moving. It is not left in place.
A working ice maker should then continue through its normal sequence:
- the mold heater starts warming the ice mold;
- the ejector begins moving;
- the ice is pushed out of the mold;
- the mechanism returns toward its home position;
- near the end of the cycle, the ice maker calls for water.
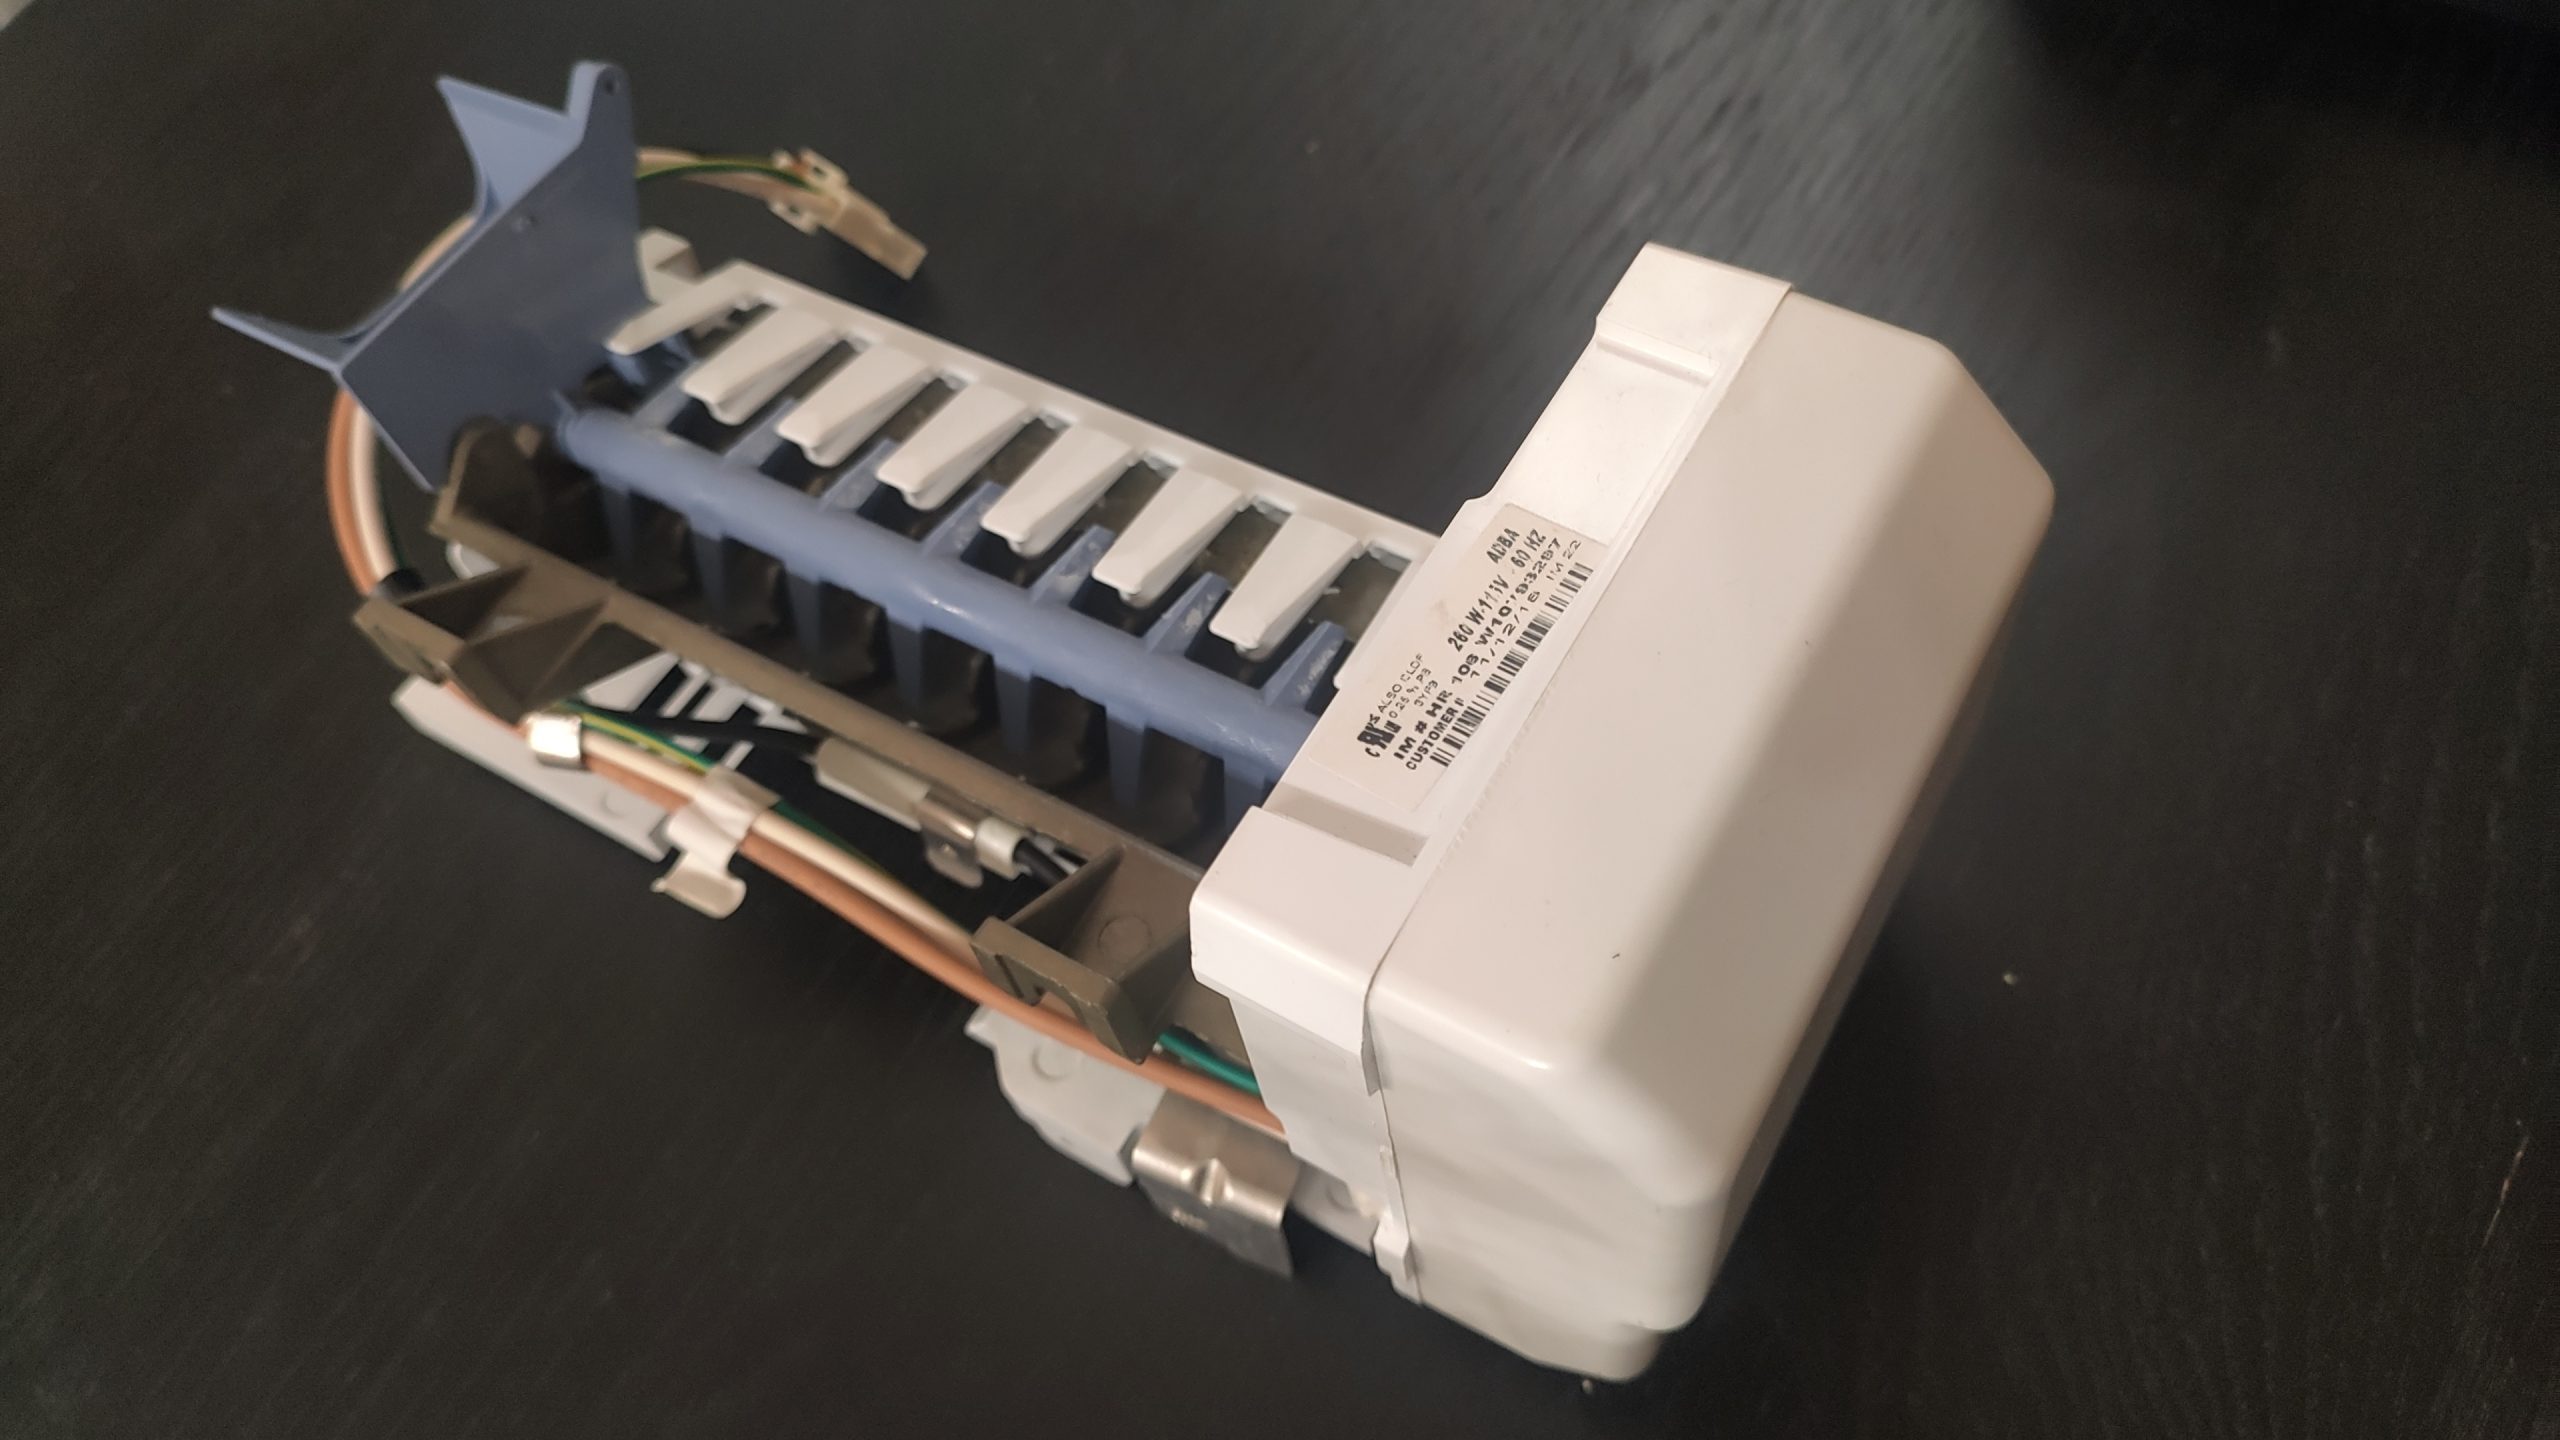
The photos may show a module removed from the refrigerator so the terminal markings are visible. In normal diagnosis, the ice maker remains installed and connected.
What the Result Means
The ice maker has 120V power, but T-H does not start the harvest cycle
If correct power reaches L and N, the T-H test is performed correctly, and the module still does not start moving, the failure is inside the ice maker assembly.
On this type of unit, the motor, heater, thermostat, timing mechanism, gears, and drive components are part of one assembly.
The honest repair is replacement of the complete ice maker assembly.
T-H starts the cycle, but the ice maker never starts by itself
This is a classic internal thermostat failure.
The T-H test bypasses the thermostat and forces the harvest cycle to begin. But in normal operation, the ice maker never recognizes that the water has frozen and never starts the cycle on its own.
The internal thermostat is not normally replaced separately. The complete ice maker assembly is replaced.
The ice maker completes harvest but does not fill with water
That does not automatically mean the ice maker is bad.
The harvest cycle completed and the ice maker requested water, but water did not arrive. The next step is checking the water-supply system: the inlet valve, water line, fill tube, or valve-control circuit.
Do not replace the ice maker assembly just because water did not arrive after harvest.
The ice maker hums, clicks, or stalls during harvest
That usually means the internal drive system, gears, or control module is failing. A jammed mechanism can produce the same symptom.
Once a self-contained 120V ice maker cannot complete its cycle reliably, replacement of the complete assembly is usually the honest repair.
Why This Test Matters
A refrigerator can stop making ice for many reasons. The freezer may be too warm. Water may not reach the ice maker. Power may not reach the module. A refrigerator control component may interrupt the circuit.
But on a classic self-contained 120V ice maker, the T-H harvest test gives a clear answer about the assembly itself.
If the ice maker receives proper power and cannot begin a forced harvest cycle, there is no reason to keep guessing about the thermostat, motor, timing mechanism, or internal gears one part at a time.
The complete ice maker assembly has failed.
When This Method Does Not Apply
Do not use the T-H method on:
- low-voltage 12–24V ice makers;
- modern door-mounted ice makers;
- ice makers in a separate refrigerator ice room;
- models with an optical ice-level board;
- models with a dedicated electronic test button;
- modules without clearly marked T and H terminals;
- refrigerators where the module design is unknown.
The terminal markings matter. The electrical design matters. A similar-looking ice maker can use a completely different circuit.
For a different Samsung ice-maker failure pattern—including Samsung Ice Master systems where this classic T-H method does not apply—read Why Your Samsung Ice Maker Freezes Up and Why the Internet Is Mostly Wrong.
Frequently Asked Questions
My 120V ice maker has no test button. Does that mean it cannot be checked?
No.
Many classic self-contained 120V ice makers use service terminals behind the front drive cover instead of a test button. The main markings are L, N, T, H, and V.
Power is checked between L and N. A technician uses T and H to initiate a forced harvest cycle.
How do you check whether power is reaching the ice maker?
With a regular multimeter between L and N.
Under normal conditions, there should be about 120V AC. But the door switch must be considered first. On some refrigerators, opening the door shuts off power to the ice maker.
During testing, the door switch must be held in the closed-door position. Otherwise, the meter may show no power even though the ice maker and its power circuit are working correctly.
Can I just turn the large drive wheel with a screwdriver?
No.
The module is marked “DO NOT ROTATE MANUALLY.” Turning the wheel by hand can damage internal gears and switches or leave the mechanism in the wrong position.
The service terminals—not the drive wheel—are used to start a proper diagnostic test.
What happens when a technician briefly connects T and H?
It bypasses the internal thermostat and forces the ice maker to begin its harvest cycle.
If the ice maker is working properly, the motor begins moving, the mold warms, the ice is ejected, the mechanism returns toward home position, and the ice maker calls for water near the end of the cycle.
The test jumper is removed as soon as the motor starts moving.
If T-H starts the cycle, does that prove the ice maker is completely good?
Not always.
It proves that the module can begin a harvest cycle. The ice maker must still complete the cycle, return to its home position, and request water.
If the test starts normally but the ice maker never begins a harvest cycle by itself during normal operation, the internal thermostat has usually failed. It is not normally replaced separately, so the complete ice maker assembly is replaced.
What does it mean if there is 120V at L and N, but the ice maker does not react to T-H?
The failure is inside the ice maker assembly.
On this type of ice maker, the motor, thermostat, heater, gears, and timing mechanism work as one unit. Repairing those parts individually usually does not make sense. The complete assembly is replaced.
The ice maker passed the T-H test but did not fill with water. Does the ice maker need replacement?
No.
The harvest cycle worked, which means the ice maker requested water. The next diagnosis is the inlet valve, water line, fill tube, or valve-control circuit.
No water after harvest does not prove that the ice maker assembly is bad.
Can I connect T and H with a paperclip or screwdriver?
I do not recommend it.
This involves live 120V power. You need to know the correct terminals, confirm incoming voltage, use a properly insulated test jumper, and remove it at the right moment. A mistake can damage the module or cause electrical shock.
My ice maker keeps making ice and will not stop. What should I do?
If the ice maker keeps producing ice after the bin is full, the ice-level control system has failed.
On a standard self-contained ice maker, that may be a broken shutoff arm or an internal level-control mechanism that is no longer stopping the cycle. On refrigerators with optical ice-level control, the problem may be the ice-level sensor itself, such as an infrared beam system.
First, try the normal shutoff method for your refrigerator: turn the ice maker off at its switch, use the refrigerator control panel, or raise the shutoff arm if the design has one.
If that does not work and the ice maker continues making ice, the simplest temporary solution is to shut off the water supply valve to the refrigerator. The ice maker may still try to cycle, but it cannot receive new water.
On some refrigerators, removing the water filter also stops water flow. You can test the dispenser after removing the filter. If the dispenser no longer fills a glass, the ice maker will not receive water either. On other models, removing the filter will not stop water flow, so the refrigerator water valve must be shut off.
The underlying failure still needs to be repaired. An ice maker should not produce ice without stopping.
Final Takeaway
A 120V ice maker without a test button is not necessarily difficult to diagnose.
Many classic self-contained models have service terminals behind the front cover. A technician can confirm incoming power at L and N, briefly use T and H to initiate harvest, and see what the ice maker actually does.
But this is live 120V work. It is not a test to perform with a paperclip, a screwdriver, or guesswork.
If proper power reaches the ice maker but it cannot begin a forced harvest cycle, replace the complete ice maker assembly.
Need Ice Maker Repair?
If your refrigerator has a classic 120V ice maker that will not harvest, will not stop producing ice, or has no power at the module, start with a proper diagnosis rather than replacing parts blindly. Visit our ice maker repair service page for local service.
EasyFix serves Clark & Cowlitz Counties and the Portland Metro Area. You can check our service areas, review how we explain appliance repair pricing, or browse more real cases and practical guides in the EasyFix repair blog.
The EasyFix team 🤝
No Upsells. No Nonsense. Just Honest Work.


